Pi Intruder Detector: 1 - Taking Photos
The code for the article can be downloaded at https://github.com/itip/raspberry-pi-examples.
Introduction
In this tutorial we’re going to make a simple intruder detector using a Raspberry Pi. Whenever movement is detected it’ll take a photo, upload it to the web and send you an email.
There’s quite a lot to discuss so we’ll break this tutorial down into three parts:
- Taking Photos - using your Raspberry Pi and the camera module.
- Motion Sensor - take a photo when an intruder is detected.
- Web & Email - create a simple website which lists photos and sends emails.
Let’s get started with part 1…
What you’ll need
1. Raspberry Pi
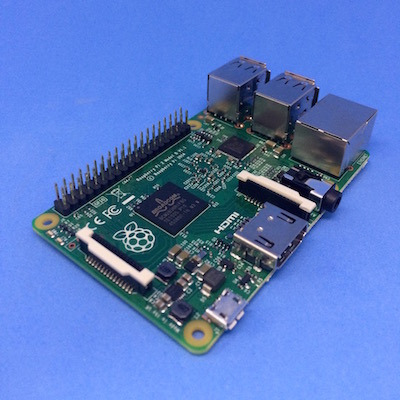
This tutorial using the newer Pi 2 Model B but you should be able to use older models. 
2. Camera Module
The official Raspberry Pi Camera Module.

3.Keyboard
A standard USB keyboard is fine.
4. Mouse
Likewise, a USB mouse is all you need.
Note:
- If you’re using a brand new Raspberry Pi then you’ll first need to set it up. Head over to the official Raspberry Pi quick start quide.
- It’s a good idea to keep the software on your Raspbery Pi up to date. The process is simple (assuming you have an Internet connect). The Raspberry Pi site has more information.
Connecting the Camera
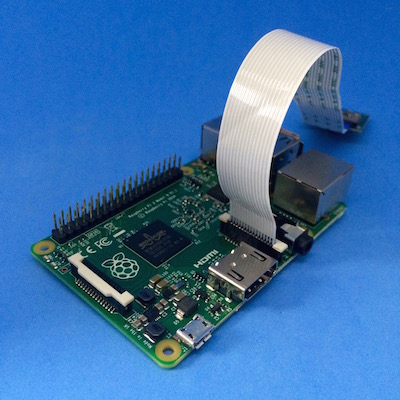
- Pull up the tab.
- Insert the camera cable and make sure the connectors are facing away from ethernet port.
- Push the connector down to keep the camera in place.

If there’s anything you’re not sure about then take a look at this video made by the Raspberry Pi team. <iframe width="560" height="315" src="https://www.youtube.com/embed/GImeVqHQzsE" frameborder="0" allowfullscreen></iframe>
Enabling the Camera
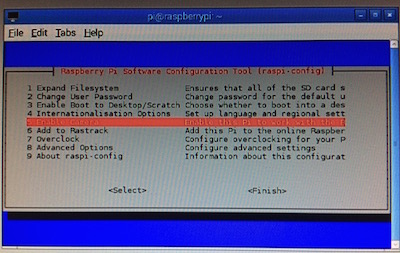
On the terminal, type sudo raspi-config.
- Choose the Camera option.

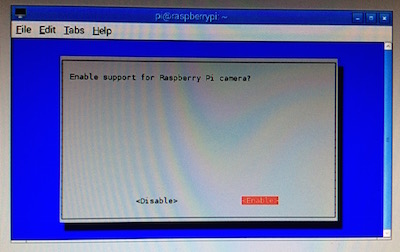
- Select Enable and the Finish

Taking a Photo (Command Line)
Before we write any code we’ll first do a quick test to make sure the camera is working.
- Open the terminal.
- Type
raspistill -o photo.jpgto take a photo. The light on the camera should flash. - The photo (called “photo.jpg”) will be saved in the current directory.
You can just as easily take a video:
- Open the terminal.
- Type
raspivid -o video.h264 -t 10000. - The camera will record 10 seconds of video and save the file in the current directory.
Note: In either case if you’re not sure what the current directory is, type pwd.
The camera is capable of doing a lot more than what we’ve discussed here. For more information on what’s possible take a look at these pages on the Raspberry Pi site.
- Still photos - raspistill.
- Video - raspivid.
Taking a Photo (Code)
It’s now time to take a photo using code. We’ll write a simple Python program which takes a photo when run. We’ll use this code as a foundation for the rest of our project - in the next step we’ll take a photo whenever motion is detected.
- Open a text editor.
- Enter the code listed below.
- Save the file as photo.py.
- Run
python photo.py. The photo will be saved in the directory which you ran the code.
# photo.py

import picamera
import time

# Put the data and time in the name of the photo.
# This make sure each photo has a unique name and none get overwitten.
name = "photo %s.jpg" % time.strftime("%H:%M:%S")

# Create the camera, set the brightness
camera = picamera.PiCamera()
camera.brightness = 60
camera.capture(name)
print "Photo Taken!!"
For details on the various settings which can be used, take a look at this page on the Raspberry Pi site.
Conclusion
So, there we have it. We’ve connected a camera to a Raspberry Pi and taken photos. In the next step we’ll connect a proximity sensor and change the code so that it takes a photo whenever it detects movement.