Beginning Apple Watch Development
The code for the article can be downloaded at https://github.com/itip/rss-apple-watch.
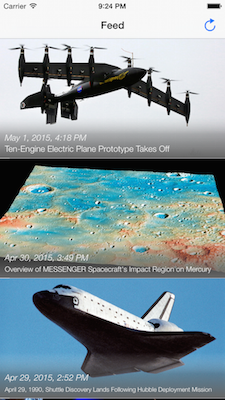
In this post we’ll investigate how you can add an Apple Watch app to existing iOS application. We’ll use a super-simple RSS reading app as a starting point and create a complimentary watch app.
 |
 |
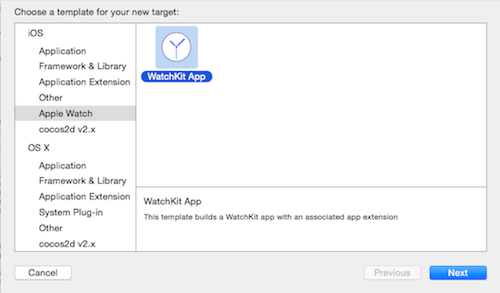
The first thing you need to do is add a WatchKit target to your app. Select File -> New -> Target... and select WatchKit App. You’ll be asked whether you want to add a Glance or a Notification; we won’t be using them in this app so they can be turned off.
You should now have two new groups in your project: an extension and a WatchKit app.
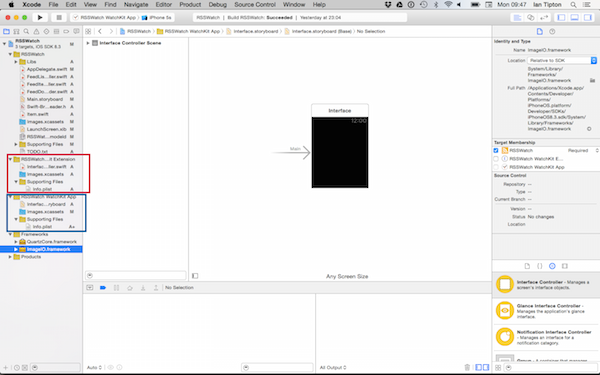
The WatcKit app contains all of the user interface code for your app. You won’t find any Objective-C or Swift files as all of the processing takes place in the extension which runs on your phone. By and large you don’t need to worry too much about this distinction as all of the data transfer is handled by the SDK, meaning you can make connections between your code and Storyboard as if they were running in the same app. However, it’s important to bear in mind that every UI update requires data to be transferred between your Watch and phone via Bluetooth. In order to keep your app as quick as possible you should try to minimise the number of UI updates.
XCode should have added an interface controller in your Storyboard (in the WatchKit app), as well as an interface controller in your extension. Rename the file to FeedListInterfaceController.swift and update the connection in my storyboard file (select the interface controller and update the class to FeedListInterfaceController).
Open your storyboard file and drag a table into your new interface. You should have a row in your table by default. We’re going to have two lines of text - set the layout of your cell to vertical and then add two labels. I’ve also changed the colours of the headline to make it more prominent.
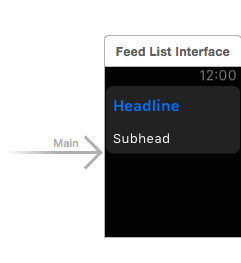
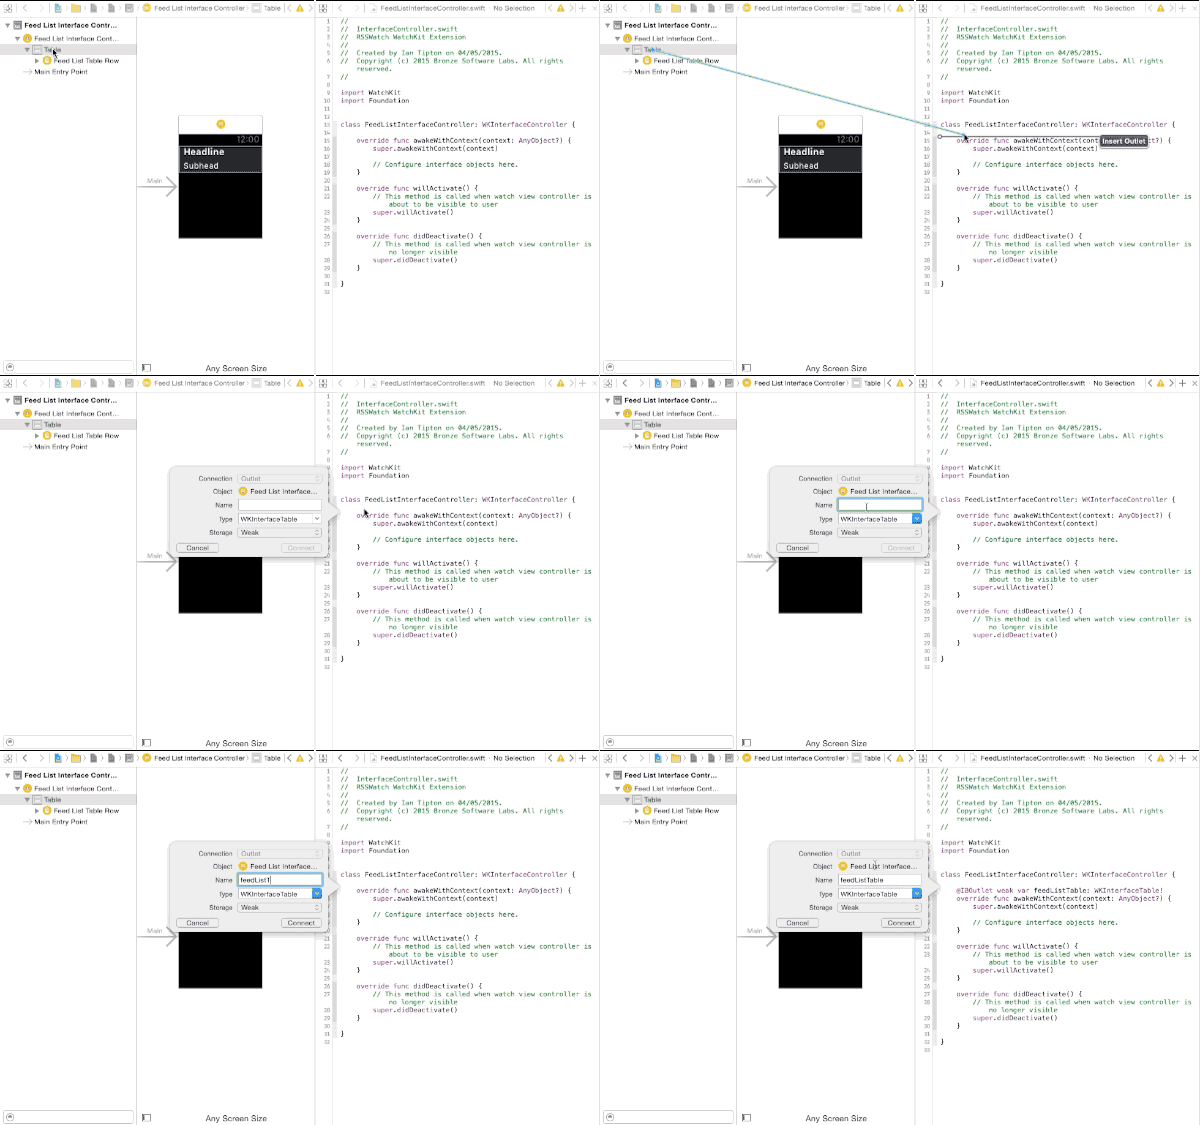
We then need to make a connection between the table in our storyboard file and FeedListInterfaceController.swift. The easiest way to do this is by selecting the “assistant” view and then making the connection by ctrl-clicking on the table and dragging a connection to your code
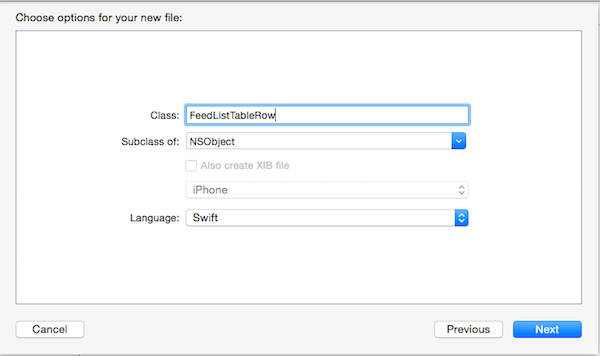
Let’s now create a custom class which represents a row in our table. Although these are called “row controllers” you don’t need to extend a special class. We can just use a standard NSObject. Call the new class FeedListTableRow.
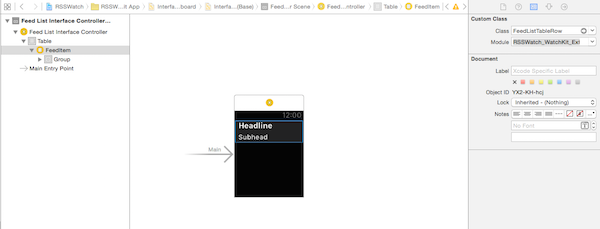
Back in Storyboard, select your table cell and
- Set the class to
FeedListTableRow - Make sure the module is set to your WatchKit extension (
RSSWatch_WatchKit_Extension) - Set the identifier to
FeedItem
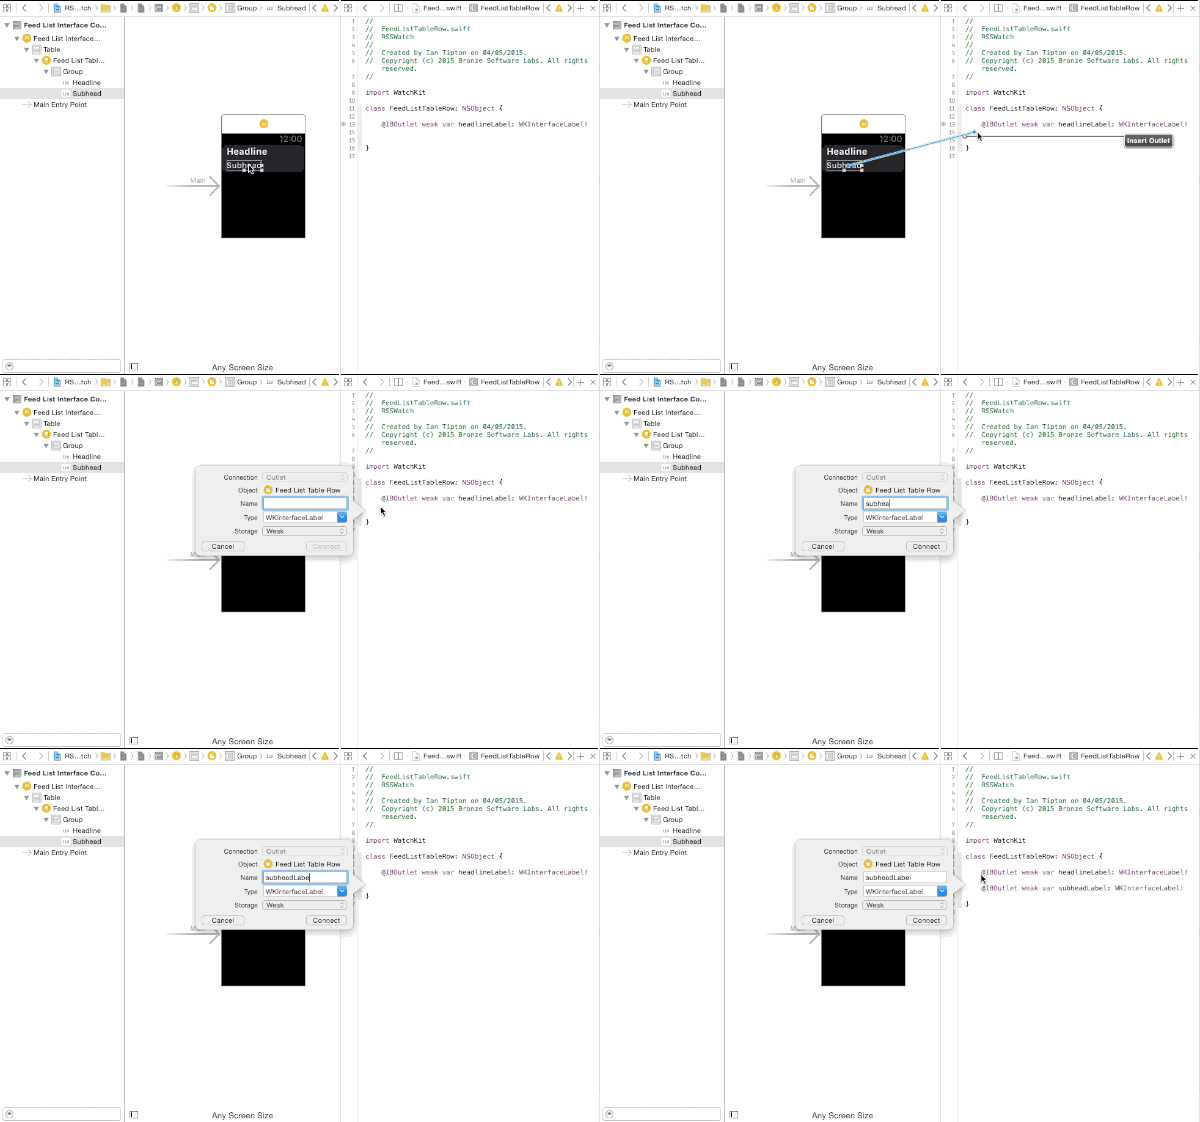
We now need to make the connections between the labels in table cell to our new FeedListTableRow object. The assisten editor probably won’t show the correct class so, if you wish to use it, select FeedListTableRow via the manual option.
To test that the connections are working, we’ll try displaying some dummy data.
WatchKit’s UIInterface tables are much simpler than UITableView, their iOS counterpart. You just tell WatchKit how many rows are in your table and then add the row data. Go to FeedListInterfaceController.swift and enter the following:
@IBOutlet weak var feedListTable: WKInterfaceTable!

override func awakeWithContext(context: AnyObject?) {
    super.awakeWithContext(context)

    self.feedListTable.setNumberOfRows(10, withRowType: "FeedItem")

    for var x=0; x < 10; x++ {
        if let tableRow = self.feedListTable.rowControllerAtIndex(x) as? FeedListTableRow{
            tableRow.headlineLabel.setText("Headline \(x+1)")
            tableRow.subheadLabel.setText("Subhead \(x+1)")
        }
    }
}
Try running the app:
- In the simulator select RSS WatchKit App extension and run.
- On an Apple Watch run the app on your phone. If you don’t see the app on your device, open the Apple Watch app on your phone, select the app and toggle Show App on Apple Watch.
All going well, you should see something like this:
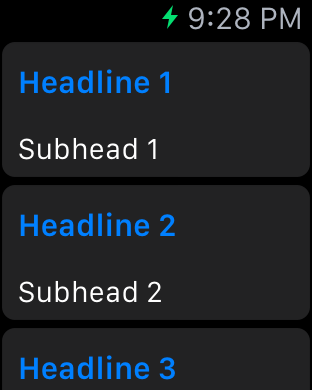
We’ll now update the app to get data from the app. Extensions are sandboxed meaning that, unless you use an app group, you can’t read data from your main app. Another option is to use WKInterfaceController.openParentApplication:reply
Replace the code in FeedListInterfaceController.swift with the following:
@IBOutlet weak var feedListTable: WKInterfaceTable!

override func awakeWithContext(context: AnyObject?) {

  WKInterfaceController.openParentApplication(["request": "feedList"],
              reply: { (replyInfo, error) -> Void in

          if let listData = replyInfo["listData"] as? NSData {
              if let feedItems = NSKeyedUnarchiver.unarchiveObjectWithData(listData) as? [[String:String]] {

                  self.feedListTable.setNumberOfRows(feedItems.count, withRowType: "FeedItem")

                  for (index, element) in enumerate(feedItems) {
                      if let tableRow = self.feedListTable.rowControllerAtIndex(index) as? FeedListTableRow{
                          let title = element["title"]
                          let date = element["date"]

                          tableRow.headlineLabel.setText(title)
                          tableRow.subheadLabel.setText(date)
                      }
                  }
              }
          }
  })
}
This code calls a method “handleWatchKitExtensionRequest” in your AppDelegate. In this code we need to gather all of our data and return in via the callback. The important thing to remember is that our data needs to be serialized so we’ll use NSKeyedArchiver (thanks to Greg Heo).
func application(application: UIApplication,
    handleWatchKitExtensionRequest userInfo: [NSObject : AnyObject]?,
    reply: (([NSObject : AnyObject]!) -> Void)!) {

    var dateFormatter = NSDateFormatter()
    dateFormatter.dateStyle = NSDateFormatterStyle.ShortStyle

    if let userInfo = userInfo, request = userInfo["request"] as? String {
        if request == "feedList" {

            // Read the most recent 10 items from the database
            let fetchRequest = NSFetchRequest()
            let entity = NSEntityDescription.entityForName("Item", inManagedObjectContext: self.managedObjectContext!)
            fetchRequest.entity = entity
            fetchRequest.fetchLimit = 10;
            fetchRequest.sortDescriptors = [NSSortDescriptor(key: "date", ascending: false)]

            var error:NSError?
            var feedItems = self.managedObjectContext!.executeFetchRequest(fetchRequest, error: &error) as? [Item]

            // If no error, put data into an array of dictionaries (more efficient that serialising Core Data objects)
            if (feedItems != nil && error == nil){
              var data = [[String:String]]()
              for item in feedItems! {
                  data.append([
                      "title":item.title,
                      "date": dateFormatter.stringFromDate(item.date),
                      "description" : item.desc,
                      "image" : item.image

                  ])
              }

              reply(["listData": NSKeyedArchiver.archivedDataWithRootObject(data)])
              return
            }
        }

    }

    // If we've reached here then it means something went wrong (or app requested data which isn't available)
    reply(["error": true])
}
The app is almost finished. We just need to add a new screen which allows the user to read the news item.
- Add a new interface controller. Add an image as well as labels for the headline, sub header and body.
- Create a push segue between the table and the detail view.
- Give the segue an identifier of Detail.
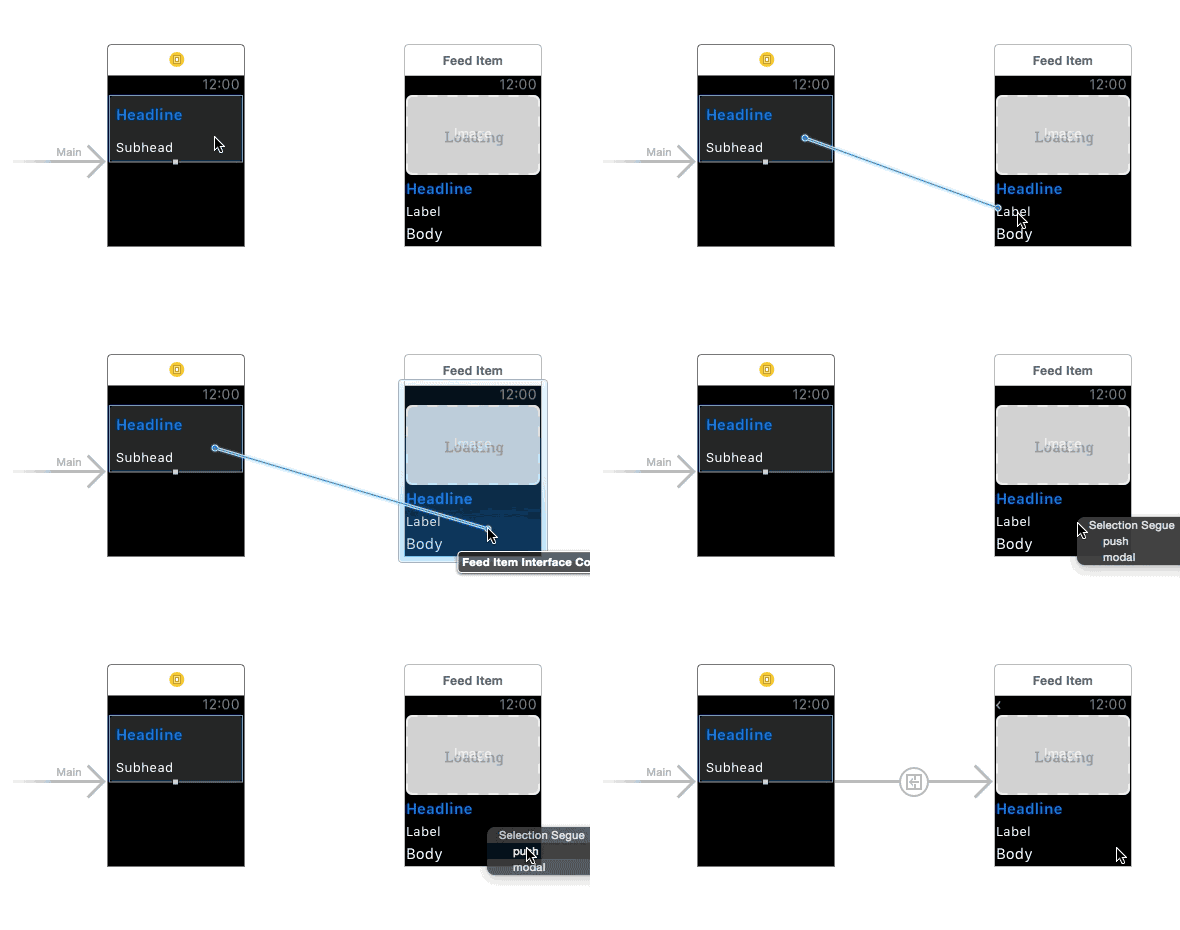
Now connect your new interface controller to a class
- Now create a new class called
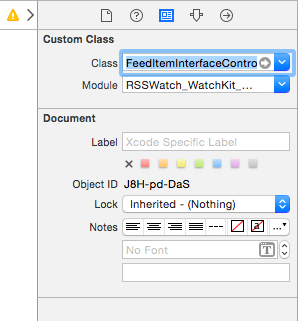
FeedItemInterfaceController.swiftwhich extends WKInterfaceController. - In your Storybaord file, set the class of your new Interface controller to
FeedItemInterfaceController - Make connections from your images and labels to your new class.
Your new interface controller should now be displayed when a user selects an item in your table view. However, we need to tell it which item should be displayed. In order to do this, override contextForSegueWithIdentifier in FeedListInterfaceController.swift and return the selected item.
- Refactor the code so that your data is accessible in the new method.
- Create the data transfer object.
class FeedListInterfaceController: WKInterfaceController {

    private var feedItems: [[String:String]]?

    WKInterfaceController.openParentApplication(["request": "feedList"],
        reply: { (replyInfo, error) -> Void in

            // Error checking. In the case of "never_launched", a more sophisticated solution would be to
            // trigger a data download.
            if let error = replyInfo["error"] as? String {
                self.errorMessageLabel.setHidden(false)

                if error == "never_launched" {
                    self.errorMessageLabel.setText("Welcome. Please open the app on your phone to initialise")
                }
                else if error == "data" {
                    self.errorMessageLabel.setText("An error occurred when reading RSS items. Please try again")
                }

                return
            }

            if let listData = replyInfo["listData"] as? NSData {
                if let items = NSKeyedUnarchiver.unarchiveObjectWithData(listData) as? [[String:String]] {
                    self.feedItems = items
                    self.refreshTable()
                }
            }
    })

    func refreshTable(){
        if let items = self.feedItems {
            self.feedListTable.setNumberOfRows(items.count, withRowType: "FeedItem")

            for (index, element) in enumerate(items) {
                if let tableRow = self.feedListTable.rowControllerAtIndex(index) as? FeedListTableRow{
                    let title = element["title"]
                    let date = element["date"]

                    tableRow.headlineLabel.setText(title)
                    tableRow.subheadLabel.setText(date)
                }
            }
        }
        else {
            self.feedListTable.setNumberOfRows(0, withRowType: "FeedItem")
        }
    }

    override func contextForSegueWithIdentifier(segueIdentifier: String, inTable table: WKInterfaceTable, rowIndex: Int) -> AnyObject? {
        if segueIdentifier == "Detail" && self.feedItems != nil {
            return self.feedItems![rowIndex]
        }
        return nil
    }
}
The data transfer object is available via the awakeWithContext method in FeedItemInterfaceController.swift.
class FeedItemInterfaceController: WKInterfaceController {

  @IBOutlet weak var imageView: WKInterfaceImage!
  @IBOutlet weak var headlineLabel: WKInterfaceLabel!
  @IBOutlet weak var subheadLabel: WKInterfaceLabel!
  @IBOutlet weak var descriptionLabel: WKInterfaceLabel!

  private var currentItem: [String: AnyObject]?

  override func awakeWithContext(context: AnyObject?) {
    super.awakeWithContext(context)

    self.currentItem = context as? [String: AnyObject]
    self.displayFeedItem()
  }

  // MARK: - UI

  func displayFeedItem() {

      if self.currentItem != nil {
          let title = self.currentItem?["title"] as? String ?? ""
          let date = self.currentItem?["date"] as? String ?? ""
          let description = self.currentItem?["description"] as? String ?? ""

          self.headlineLabel.setText(title)
          self.subheadLabel.setText(date);
          self.descriptionLabel.setText(description)
      }
  }
}
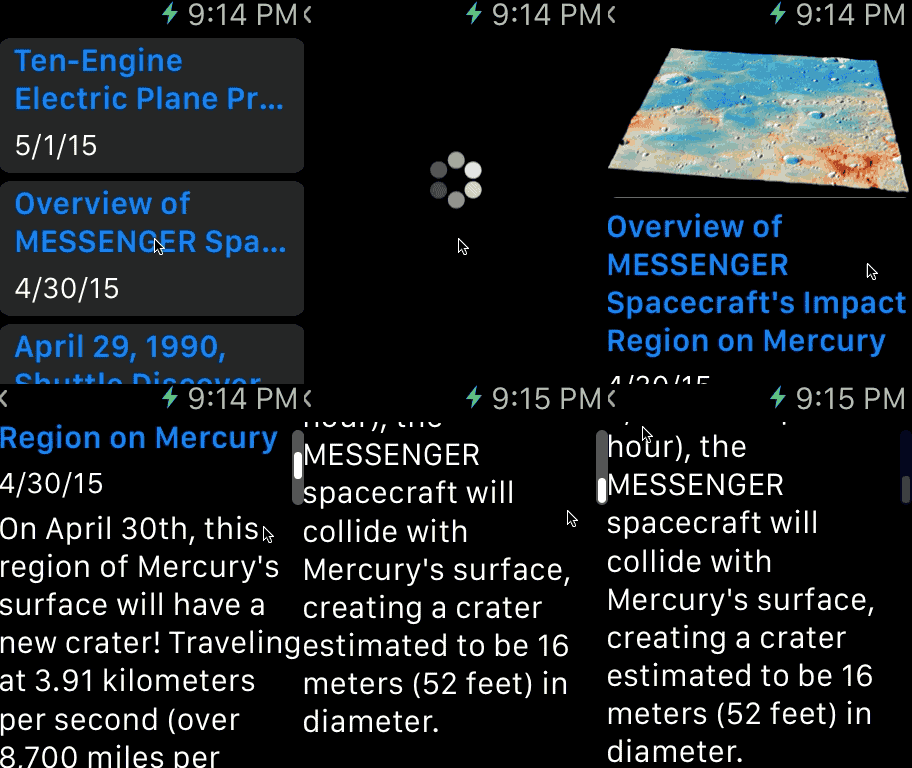
The final step is to display the image. In order to do this, we’ll willActivate which gets called after awakeWithContext. This means we’ll download the feed item will be displayed while we’re waiting for the image to be transferred.
We’ll download the image, resize it for the WatchKit and then cache using WKInterfaceDevice.addCachedImageWithData
class FeedItemInterfaceController: WKInterfaceController {

  ...

  override func awakeWithContext(context: AnyObject?) {
      super.awakeWithContext(context)

      self.currentItem = context as? [String: AnyObject]
      self.displayFeedItem()
  }

  override func willActivate() {
      // This method is called when watch view controller is about to be visible to user
      super.willActivate()

      self.displayImage()
  }

  ...

  /*
   Display the image. We'll attempt to read from the cache if possible
   */
   func displayImage(){

        // When storing images in the device cache, we'll use the URL of the image as the key
        if let imageKey = self.currentItem?["image"] as? String {

            // See if image has already been cached
            for (key, value) in WKInterfaceDevice.currentDevice().cachedImages {
                if let imageName = key as? NSString, imageSize = value as? NSNumber {
                    if imageKey == imageName {
                        self.imageView.setImageNamed(imageKey)
                        return
                    }
                }
            }

            // If we've reached this point then it means we don't have the image in our cache. Download, resize, and cache
            if let url = NSURL(string: imageKey){
                let request = NSURLRequest(URL: url)

                let task = NSURLSession.sharedSession().downloadTaskWithRequest(request, completionHandler: { (imageUrl, response, error) -> Void in

                    if error != nil {
                        NSLog("Unable to load image %@", error)
                        return;
                    }

                    // We've downloaded the image, resize to fit Watch screen and store incache
                    if let image = UIImage(contentsOfFile: imageUrl.path!) {

                        // Calculate width/height ratio of current image and resize the new image accordingly
                        let ratio = (image.size.width / image.size.height);
                        let deviceBounds = WKInterfaceDevice.currentDevice().screenBounds
                        let newHeight = deviceBounds.height / ratio

                        // http://stackoverflow.com/a/2658801/578821
                        let newSize = CGSizeMake(deviceBounds.width, newHeight)
                        UIGraphicsBeginImageContextWithOptions(newSize, false, 0.0);
                        image.drawInRect(CGRectMake(0, 0, newSize.width, newSize.height))
                        let newImage = UIGraphicsGetImageFromCurrentImageContext()
                        let newImageData = UIImagePNGRepresentation(newImage)
                        UIGraphicsEndImageContext()

                        // We have the resized image. Cache.
                        if WKInterfaceDevice.currentDevice().addCachedImageWithData(newImageData, name: imageKey){
                            self.imageView.setImageNamed(imageKey)
                        }
                        else {
                            // Image couldn't be cached. This might be because cache is full. Try clearing cache.
                            // Note: ideally you'd want to just remove the oldest items but there isn't an API
                            // available so you'd need to implement that yourself
                            WKInterfaceDevice.currentDevice().removeAllCachedImages()

                            if WKInterfaceDevice.currentDevice().addCachedImageWithData(newImageData, name: imageKey){
                                self.imageView.setImageNamed(imageKey)
                            }
                        }
                    }
                })
                task.resume()
            }

        }

    }
}
That’s it, we’re finished!! If you have any questions or comments then feel free to get in touch.
The code for the article can be downloaded at https://github.com/itip/rss-apple-watch.